DevOps Project : AWS Infrastructure and Application Automation with Terraform and Github Actions
I first started working with AWS in 2019, doing everything manually through the console. In 2022, I discovered infrastructure automation with Terraform and GitHub Actions, and it completely transformed how I work. I created this sample project to share what I’ve learned along the way.
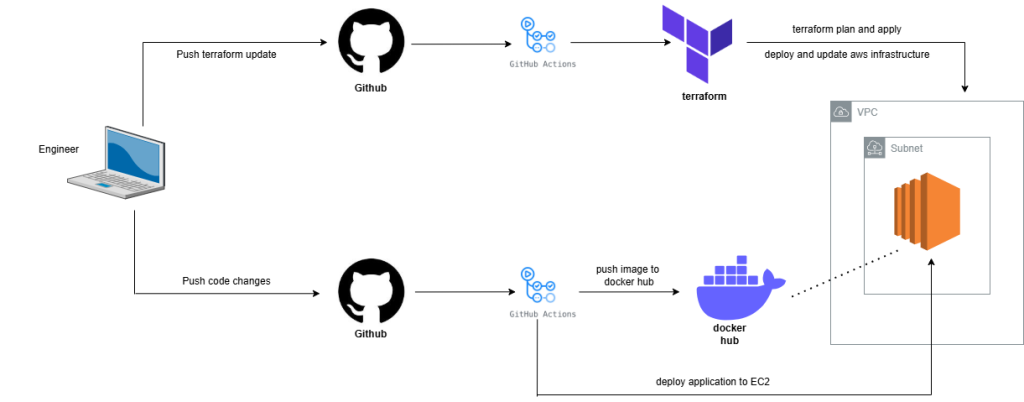
This project demonstrates how to automate AWS infrastructure and application deployments using Terraform and GitHub Actions. It’s designed as a learning resource to help others experience the same “aha” moment I had when I realized how powerful these tools can be when used together.
Before you start this project you need to create : AWS Account, Docker Hub Account and Github Account.
AWS Account
AWS provides a 1-year free tier for new accounts, which we’ll leverage for this project. Start by creating a new AWS account to access these free services. Once your account is set up, create an IAM user and generate an Access Key to enable programmatic access to AWS resources.
Docker Hub
If you don’t have a Docker Hub account, start by visiting Docker Hub and clicking “Sign Up”. Create a free account using your email address. Once registered and logged in, go to your account settings. Navigate to the “Security” or “Access Tokens” section, then click “Create Access Token”. Choose the appropriate permissions for your token (read/write), generate it, and immediately copy the token. Store this token securely, as it will only be displayed once.
SSH Key Pair
For creating an SSH key pair, you have two primary methods: using PuTTYgen (for Windows) or ssh-keygen (for Linux/macOS). On Linux or macOS, open a terminal and run ssh-keygen -t rsa -b 4096. This command generates a public and private key pair. When prompted, you can enter a passphrase for additional security or press Enter to skip. The keys will be saved in the default location (~/.ssh/id_rsa for private key and ~/.ssh/id_rsa.pub for public key). For Windows users, download PuTTYgen, click “Generate”, and move your mouse randomly to generate randomness. Save both the private and public keys, ensuring you keep the private key confidential.
Github
To create a GitHub account, visit github.com and click “Sign up”. Enter your email address, choose a unique username, and create a strong password. Select the appropriate account type (typically Free for personal use) and complete the signup process. Once registered, verify your email address. For enhanced security, enable Two-Factor Authentication (2FA) in your account settings under “Password and authentication”.
To set up secrets for GitHub Actions, navigate to your repository on GitHub, go to “Settings” > “Secrets and variables” > “Actions”, then click “New repository secret”. Create the following secrets:
AWS_ACCESS_KEY_ID: Your AWS IAM user access keyAWS_SECRET_ACCESS_KEY: The corresponding AWS secret access keyDOCKERHUB_USERNAME: Your Docker Hub usernameDOCKERHUB_TOKEN: The access token generated from Docker HubSSH_PRIVATE_KEY: The contents of your private SSH key (copied from~/.ssh/id_rsaor the private key file generated with PuTTYgen)
Ensure you paste the exact values carefully, without any extra spaces or line breaks. These secrets will be encrypted and can be used in your GitHub Actions workflows to authenticate and perform actions securely without exposing sensitive credentials in your code.
Infrastruture Setup
Initial Setup : Terraform State Bucket
- Navigate to the Terraform bootstrap directory /terraform/bootstrap/terraform-state
- Modify the bucket name to match your project’s naming convention in
main.yml - Run the below commands from your local machine
terraform init
terraform apply
This creates the remote state bucket for storing Terraform state files.
Infrastructure Deployment
- All AWS infrastructure configurations are located in /terraform/services/.
- Variables can be updated in the
terraform.tfvarsfile - Modify this file to adjust infrastructure parameters and resource configurations
Github workflows for Terraform
We separated 2 yaml file for terraform plan and terraform apply
- The
tf-plan.ymlworkflow is automatically triggered when code is pushed to any branch in the repository - Any modifications made within the
terraform/services/directory will initiate both thetf-planandtf-applyworkflows depend on the branch. - When a pull request is merged or code is pushed directly to the main branch, the
tf-applyworkflow will be executed
Due to the interdependent nature of infrastructure components, please deploy resources in the following sequence: VPC, subnet, and EC2 instance. Pushing changes to the specific directory will trigger an automatic deployment through GitHub Actions.
EC2 Access
After provisioning the EC2 instance, you may access the server securely through AWS Systems Manager (SSM) and proceed with the following tasks:
- Add user
- Grant username with root access
- Modify /etc/ssh/sshd_config
- Add Public key to Authorized Key
You can see the detail steps here : https://github.com/nasir19noor/devops-aws-terraform-docker-actions/tree/main/terraform/services/ec2
Once done you need to add 2 more secrets for GitHub Actions:
USER: Your Linux usernameINSTANCE_IP: IP Address of EC2 instance
Github workflows for Application Deployment
The workflow app-build-deploy.yml is configured to activate under three specific scenarios:
- Push Events: Triggered when code is pushed to any branch, specifically monitoring changes within the ‘app/’ directory.
- Pull Request Events: Activated when a pull request is made to the main branch, again focusing on modifications in the ‘app/’ directory.
- Manual Dispatch: Allows manual triggering of the workflow directly from the GitHub Actions interface, providing flexibility for on-demand builds and deployments.
The workflow executes a series of sophisticated steps to build, containerize, and deploy the application:
- Repository Checkout: Retrieves the latest source code using GitHub’s checkout action.
- Docker Buildx Setup: Configures an advanced Docker build environment, enabling multi-architecture builds and enhanced build capabilities.
- Docker Hub Authentication: Securely logs into Docker Hub using encrypted credentials stored as GitHub Secrets.
- Image Metadata Preparation: Dynamically generates Docker image tags, including a ‘latest’ tag and a short Git commit SHA tag for precise version tracking.
- Docker Image Build and Push: Constructs the Docker image using the application’s Dockerfile and pushes the tagged images to Docker Hub.
- SSH Deployment Configuration: Sets up SSH credentials for secure remote deployment.
- Remote Deployment: Connects to the target server, pulls the latest Docker image, stops any running containers, and launches the new application container.
My journey from manually managing AWS resources to embracing infrastructure automation has been nothing short of revolutionary. This project is more than just a technical walkthrough — it’s a testament to how the right tools can transform your workflow, making complex deployments feel like magic. If you’re a developer or DevOps enthusiast feeling overwhelmed by manual infrastructure management, this is your invitation to break free. Fork the repository, experiment with the code, and experience firsthand how Terraform, GitHub Actions, and Docker can simplify your development process. Don’t just read about automation — start your own automation journey today and unlock a more efficient, stress-free way of building and deploying applications.
You can see complete code here : https://github.com/nasir19noor/devops-aws-terraform-docker-actions
Also published in medium : https://nasir19noor.medium.com/devops-project-aws-infrastructure-and-application-automation-with-terraform-and-github-actions-89f10f06cdbe