DNS Management in Cloudflare: A Complete Infrastructure-as-Code Approach with Terraform and GitHub Actions
I have experience managing several domains for both personal and professional purposes. Initially, I handled most domains through their provider’s default DNS management system. For instance, when purchasing domains from GoDaddy, I utilized their included DNS management service. While their DNS manager is reliable, it has limitations in terms of advanced functionality. Cloud platforms such as AWS and GCP offer more sophisticated DNS services like Route 53 and Cloud DNS, respectively. These services provide significantly enhanced features compared to traditional DNS managers, particularly when integrating with other services within their respective cloud ecosystems.
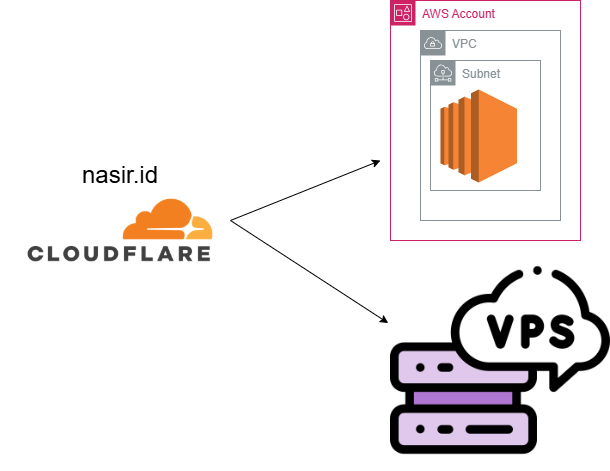
I currently manage multiple domains with infrastructure distributed across various locations. For example, my personal domain nasir.id has infrastructure components hosted on AWS, GCP, and VPS providers. To better manage this distributed setup, I transitioned from conventional DNS management to Cloudflare. Additionally, I implemented Infrastructure as Code (IaC) using Terraform and established automated workflows through GitHub Actions.
In the following section, I will outline the process of migrating DNS management for nasir.id to Cloudflare and implementing a comprehensive DevOps strategy.
Why Cloudflare for DNS?
Before diving into the technical implementation, let me explain why I chose Cloudflare:
- Performance and Reliability: Cloudflare operates one of the world’s largest DNS networks with 200+ data centers globally, providing sub-10ms response times worldwide.
- Security Features: Built-in DDoS protection, DNSSEC support, and advanced security features that come free with their DNS service.
- Cost-Effective: Cloudflare’s DNS service is free for basic usage, with enterprise features available at competitive prices.
- Developer-Friendly: Excellent API documentation, Terraform provider support, and comprehensive tooling for automation.
- Additional Services: Easy integration with CDN, SSL certificates, and other Cloudflare services if needed later.
Cloudflare Setup
1. Assessment and Planning
First, I audited my existing DNS records across multiple providers. I created a spreadsheet documenting:
- All domains and subdomains
- Record types (A, CNAME, MX, TXT, etc.)
- Current TTL values
- Dependencies and critical services
2. Cloudflare Setup
I created a Cloudflare account and added my domains. Cloudflare automatically scanned and imported existing DNS records, which saved significant time during the migration. But I removed all records since I want to manage all records via Terraform only.
3. Generating API Token
Before implementing the Terraform configuration, you’ll need to generate a Cloudflare API token with appropriate permissions. Here’s the complete step-by-step process:
- From the Cloudflare dashboard, go to My Profile > API Tokens and select Create Token.
- For DNS management, I recommend using the “Edit zone DNS” template as it provides the exact permissions needed for Terraform DNS operations. Select a template from the available API token templates or create a custom token.
- Modify the token’s permissions. After selecting a permissions group (Account, User, or Zone), choose what level of access to grant the token.
- Copy the secret to a secure place. The token is only displayed once and cannot be retrieved later.
- For the GitHub Actions workflow, add your token as a repository secret.
- Go to your repository → Settings → Secrets and variables → Actions
- Click “New repository secret” Name:
CLOUDFLARE_API_TOKEN - Value: Your generated API token
- Click “Add secret”
- Cloudflare provides a verification endpoint to test your token:
curl "https://api.cloudflare.com/client/v4/user/tokens/verify" \ --header "Authorization: Bearer YOUR_API_TOKEN_HERE"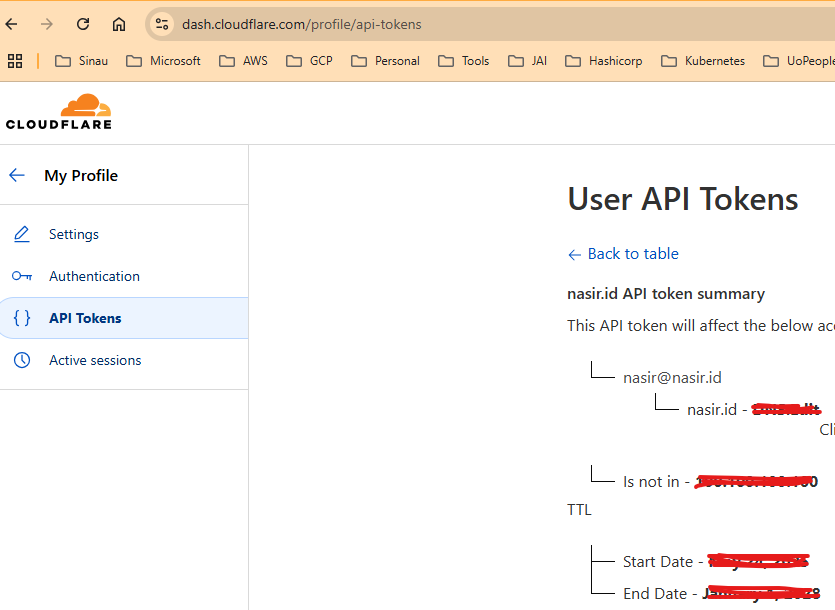
Setting Up Infrastructure as Code with Terraform
Project Structure
I organized my Terraform configuration with a clean, flat structure that keeps everything simple and maintainable:
├── cloudflare/
│ ├── backend.tf
│ ├── data.tf
│ ├── dns.tf
│ ├── locals.tf
│ ├── main.tf
│ ├── outputs.tf
│ ├── provider.tf
│ └── variables.tf
├── .github/
│ └── workflows/
│ ├── cloudflare-plan.yml
│ └── cloudflare-apply.yml
└── README.md
This structure separates concerns clearly:
- backend.tf: Terraform state configuration
- data.tf: Data sources (zone lookups, etc.)
- dns.tf: All DNS record configurations
- locals.tf: Local values and computed variables
- main.tf: Main configuration and resource calls
- outputs.tf: Output values
- provider.tf: Cloudflare provider configuration
- variables.tf: Input variable definitions
Terraform Configuration Files
Here’s the actual Terraform configuration I use for managing nasir.id:
provider.tf
terraform {
  required_version = ">= 1.0"
    required_providers {
      cloudflare = {
        source  = "cloudflare/cloudflare"
        version = "~> 4.46.0"
      }
    }
}

provider "cloudflare" {
}
backend.tf
terraform {
  backend "s3" {
    bucket = "terraform.nasir.id"
    region = "ap-southeast-1"
    key = "cloudflare/terraform.tfstate"
  }
}
data.tf
data "cloudflare_zones" "nasir_id" {
  filter {
    name = "nasir.id"
  }
}
locals.tf
locals {
  config                  = yamldecode(file("../config.yaml"))
  region                  = local.config.aws.global.region
  bucket                  = local.config.aws.global.state_bucket
  zone_id                 = local.config.cloudflare.zone_id
  root                    = local.config.cloudflare.root
  contabo_ip              = local.config.contabo.ip
}
variables.tf
variable "cloudflare_zone_id" {
  description = "zone id"
  type    = string
  default = "nasir.id"
}
dns.tf
# MX Record for Google Workspace
resource "cloudflare_record" "mx-1" {
  zone_id = data.cloudflare_zones.nasir_id.zones[0].id
  name    = local.root
  content = "ASPMX.L.GOOGLE.COM."
  type    = "MX"
  priority = 1
  ttl     = 3600
}

resource "cloudflare_record" "mx-2" {
  zone_id = data.cloudflare_zones.nasir_id.zones[0].id
  name    = local.root
  content = "ALT1.ASPMX.L.GOOGLE.COM."
  type    = "MX"
  priority = 5
  ttl     = 3600
}

resource "cloudflare_record" "mx-3" {
  zone_id = data.cloudflare_zones.nasir_id.zones[0].id
  name    = local.root
  content = "ALT2.ASPMX.L.GOOGLE.COM."
  type    = "MX"
  priority = 5
  ttl     = 3600
}

resource "cloudflare_record" "mx-4" {
  zone_id = data.cloudflare_zones.nasir_id.zones[0].id
  name    = local.root
  content = "ALT3.ASPMX.L.GOOGLE.COM."
  type    = "MX"
  priority = 10
  ttl     = 3600
}

resource "cloudflare_record" "mx-5" {
  zone_id = data.cloudflare_zones.nasir_id.zones[0].id
  name    = local.root
  content = "ALT4.ASPMX.L.GOOGLE.COM."
  type    = "MX"
  priority = 10
  ttl     = 3600
}

# A record nasir.id
resource "cloudflare_record" "nasir-id" {
  zone_id = data.cloudflare_zones.nasir_id.zones[0].id
  name    = local.root
  content = local.contabo_ip
  type    = "A"
  ttl     = 1
  proxied = true
}
outputs.tf
output "zone_id" {
  value = data.cloudflare_zones.nasir_id.zones[0].id
}
Github Actions Integration
Terraform Plan Workflow
name: 'Cloudflare Plan'

on:
  push:
    branches: [ '**' ]
    paths:
      - 'cloudflare/**.tf'
      - 'cloudflare/**.tfvars'
      - '.github/workflows/cloudflare-plan.yml'

env:
  TF_VERSION: '1.11.4'
  AWS_REGION: 'ap-southeast-1'
  CLOUDFLARE_API_TOKEN: ${{ secrets.CLOUDFLARE_API_TOKEN }}

jobs:
  terraform-plan:
    name: Cloudflare Plan
    runs-on: ubuntu-latest
    steps:
      - name: Checkout Repository
        uses: actions/checkout@v3

      - name: Configure AWS CLI
        run: |
          # Install AWS CLI if not already available
          curl https://awscli.amazonaws.com/awscli-exe-linux-x86_64.zip -o awscliv2.zip \
          && unzip awscliv2.zip \
          && ./aws/install \
          && rm -rf aws awscliv2.zip

          # Configure AWS credentials
          mkdir -p ~/.aws

          # Create credentials file
          cat > ~/.aws/credentials << EOF
          [default]
          aws_access_key_id=${{ secrets.AWS_ACCESS_KEY_ID }}
          aws_secret_access_key=${{ secrets.AWS_SECRET_ACCESS_KEY }}
          EOF

          # Create config file with region
          cat > ~/.aws/config << EOF
          [default]
          region=${{ env.AWS_REGION }}
          output=json
          EOF

          # Verify credentials are working (optional)
          aws sts get-caller-identity
      - name: Setup Terraform

        run: |
          # Install Terraform if not already available
          wget -O- https://apt.releases.hashicorp.com/gpg | \
          gpg --dearmor | \
          sudo tee /usr/share/keyrings/hashicorp-archive-keyring.gpg
          echo "deb [signed-by=/usr/share/keyrings/hashicorp-archive-keyring.gpg] \
          https://apt.releases.hashicorp.com $(lsb_release -cs) main" | \
          sudo tee /etc/apt/sources.list.d/hashicorp.list
          sudo apt update
          sudo apt-get install terraform

          # Verify Terraform installation
          terraform version

      - name: Terraform Init
        run: |
          cd cloudflare
          terraform init

      - name: Terraform Validate
        run: |
          cd cloudflare
          terraform validate

      - name: Terraform Plan
        id: plan
        run: |
          cd cloudflare
          terraform plan -no-color
        continue-on-error: true
Terraform Apply Workflow
name: 'Cloudflare Apply'
on:
push:
branches:
- main
paths:
- 'cloudflare/**.tfvars'
- 'cloudflare/**.tf'
- '.github/workflows/cloudflare-apply.yml'
env:
TF_VERSION: '1.11.4'
AWS_REGION: 'ap-southeast-1'
CLOUDFLARE_API_TOKEN: ${{ secrets.CLOUDFLARE_API_TOKEN }}
jobs:
terraform-apply:
name: Cloudflare Apply
runs-on: ubuntu-latest
steps:
- name: Checkout Repository
uses: actions/checkout@v3
- name: Configure AWS CLI
run: |
# Install AWS CLI if not already available
curl https://awscli.amazonaws.com/awscli-exe-linux-x86_64.zip -o awscliv2.zip \
&& unzip awscliv2.zip \
&& ./aws/install \
&& rm -rf aws awscliv2.zip
# Configure AWS credentials
mkdir -p ~/.aws
# Create credentials file
cat > ~/.aws/credentials << EOF
[default]
aws_access_key_id=${{ secrets.AWS_ACCESS_KEY_ID }}
aws_secret_access_key=${{ secrets.AWS_SECRET_ACCESS_KEY }}
EOF
# Create config file with region
cat > ~/.aws/config << EOF
[default]
region=${{ env.AWS_REGION }}
output=json
EOF
# Verify credentials are working (optional)
aws sts get-caller-identity
- name: Setup Terraform
run: |
# Install Terraform if not already available
wget -O- https://apt.releases.hashicorp.com/gpg | \
gpg --dearmor | \
sudo tee /usr/share/keyrings/hashicorp-archive-keyring.gpg
echo "deb [signed-by=/usr/share/keyrings/hashicorp-archive-keyring.gpg] \
https://apt.releases.hashicorp.com $(lsb_release -cs) main" | \
sudo tee /etc/apt/sources.list.d/hashicorp.list
sudo apt update
sudo apt-get install terraform
# Verify Terraform installation
terraform version
- name: Terraform Init
run: |
cd cloudflare
terraform init
- name: Terraform Validate
run: |
cd cloudflare
terraform validate
- name: Terraform Plan
id: plan
run: |
cd cloudflare
terraform plan -no-color
continue-on-error: true
- name: Terraform Apply
id: apply
run: |
cd cloudflare
terraform apply -auto-approve
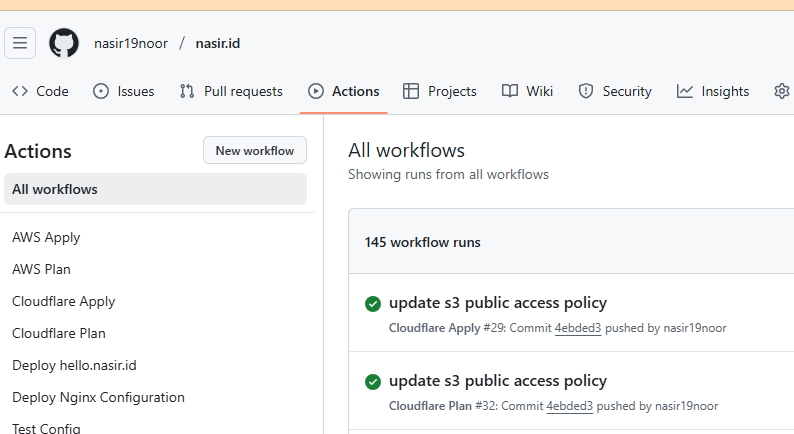
continue-on-error: falseUpon updating DNS records and pushing changes to the repository, GitHub Actions will automatically trigger and apply the corresponding updates to the Cloudflare DNS records
Conclusion
Migrating DNS management to Cloudflare and implementing Infrastructure as Code practices transformed how I manage DNS infrastructure. The combination of Cloudflare’s robust DNS platform, Terraform’s declarative configuration management, and GitHub Actions’ automation capabilities created a reliable, auditable, and scalable DNS management system.
The initial investment in setup time pays dividends through reduced operational overhead, improved reliability, and enhanced security posture. If you’re managing DNS manually or across multiple providers, I highly recommend considering a similar approach.
The key to success is starting with a clear migration plan, implementing proper testing procedures, and gradually expanding automation capabilities as your confidence in the system grows.
You can see all scripts here https://github.com/nasir19noor/nasir.id
It is also published in medium https://nasir19noor.medium.com/migrating-dns-management-to-cloudflare-a-complete-infrastructure-as-code-approach-with-terraform-10ed03c2455d