From Paper to Practice: My Real-World HashiCorp Vault Learning Journey
Like many engineers, I earned my HashiCorp Vault certification and proudly displayed it on LinkedIn. But let’s be honest—passing an exam and wielding Vault in production are two entirely different beasts.
Everything changed when I joined a big startup migration project where Vault wasn’t just a nice-to-have security tool—it was the backbone of their entire secrets management strategy. Suddenly, those theoretical concepts from my certification study sessions became daily realities. Database credentials, API keys, TLS certificates—everything flowed through Vault, and I was thrown into the deep end.
That’s when the real learning began.
Determined to bridge the gap between my theoretical knowledge and practical expertise, I decided to roll up my sleeves and build my own Vault environment. I spun up an Ubuntu 24.04 VPS and began experimenting with real-world scenarios that mirror what I encounter in production.
What followed was an eye-opening journey that transformed my understanding of secrets management, security policies, and infrastructure automation. In this comprehensive guide, I’ll walk you through my hands-on approach to mastering Vault—from installation on Ubuntu 24.04 to practical examples you can implement in your projects.
Whether you’re a fellow certificate holder looking to gain real experience or a developer curious about modern secrets management, this article will give you the practical foundation you need to work with HashiCorp Vault in production environments confidently.
Setting up HashiCorp Vault on Ubuntu 24.04
My journey began with setting up a production-ready Vault instance on my VPS. Rather than taking shortcuts with Docker or development mode, I wanted to understand the full deployment process—complete with SSL termination, proper systemd integration, and security hardening.
Prerequisites and System Preparation
First, I ensured my Ubuntu 24.04 system was up to date and installed the necessary dependencies:
sudo apt update && sudo apt upgrade -y
sudo apt install curl wget gnupg lsb-release nginx certbot python3-certbot-nginx -y
The choice of Nginx here is strategic—while Vault has a built-in web UI, placing it behind a reverse proxy provides SSL termination, load balancing capabilities, and an additional security layer.
Installing HashiCorp Vault
HashiCorp provides an official APT repository, which I prefer over manual binary downloads for easier updates and package management:
curl -fsSL https://apt.releases.hashicorp.com/gpg | sudo apt-key add -
sudo apt-add-repository "deb [arch=amd64] https://apt.releases.hashicorp.com $(lsb_release -cs) main"
sudo apt update
sudo apt install vault -y
vault version
Creating the Vault User and Directory Structure
Security best practices dictate that Vault should run under its own dedicated user account, not root. I created a system user and established the proper directory structure:
sudo useradd --system --home /etc/vault.d --shell /bin/false vault
sudo mkdir -p /opt/vault/data
sudo mkdir -p /etc/vault.d
sudo mkdir -p /var/log/vault
sudo chown -R vault:vault /opt/vault
sudo chown -R vault:vault /etc/vault.d
sudo chown -R vault:vault /var/log/vault
This setup follows Unix principles: a dedicated system user with no shell access, separate directories for data, configuration, and logs, with appropriate ownership permissions.
Configuring Vault
The configuration file is where Vault’s behavior is defined located in /etc/vault.d/vault.hcl. Here’s the configuration I used for my setup:
ui = true
disable_mlock = true

storage "file" {
  path = "/opt/vault/data"
}

listener "tcp" {
  address     = "127.0.0.1:8200"
  tls_disable = 1
}

api_addr = "https://vault.nasir.id"
cluster_addr = "https://vault.nasir.id:8201"

log_level = "INFO"
log_file = "/var/log/vault/vault.log"
Key configuration decisions explained:
- UI enabled: Essential for learning and debugging
- File storage: Simple for single-node setups, though Consul or cloud storage would be preferred for production clusters
- TLS disabled on listener: Since Nginx handles SSL termination
- Memory lock disabled: Prevents Vault from locking memory pages (acceptable for development environments)
I saved this configuration and set appropriate permissions:
sudo chown vault:vault /etc/vault.d/vault.hcl
sudo chmod 640 /etc/vault.d/vault.hcl
Creating the Systemd Service
To ensure Vault starts automatically and runs reliably, I created a comprehensive systemd service file /etc/systemd/system/vault.service :
[Unit]
Description=HashiCorp Vault
Documentation=https://www.vaultproject.io/docs/
Requires=network-online.target
After=network-online.target
ConditionFileNotEmpty=/etc/vault.d/vault.hcl
StartLimitIntervalSec=60
StartLimitBurst=3

[Service]
Type=notify
User=vault
Group=vault
ProtectSystem=full
ProtectHome=read-only
PrivateTmp=yes
PrivateDevices=yes
SecureBits=keep-caps
AmbientCapabilities=CAP_IPC_LOCK
CapabilityBoundingSet=CAP_SYSLOG CAP_IPC_LOCK
NoNewPrivileges=yes
ExecStart=/usr/bin/vault server -config=/etc/vault.d/vault.hcl
ExecReload=/bin/kill -HUP $MAINPID
KillMode=process
Restart=on-failure
RestartSec=5
TimeoutStopSec=30
StartLimitInterval=60
StartLimitBurst=3
LimitNOFILE=65536
LimitMEMLOCK=infinity

[Install]
WantedBy=multi-user.target
This service configuration includes security hardening measures like filesystem isolation, capability restrictions, and automatic restart policies. After creating the service:
sudo systemctl daemon-reload
sudo systemctl enable vault
sudo systemctl start vault
sudo systemctl status vault
SSL Configuration with Let’s Encrypt
Security is paramount with Vault, so I configured SSL using Let’s Encrypt certificates:
service nginx stop
sudo certbot certonly --standalone -d vault.nasir.id
sudo systemctl start nginx
The Nginx configuration provides SSL termination and proxies requests to Vault /etc/nginx/sites-available/vault.nasir.id :
server {
    listen 80;
    server_name vault.nasir.id;
    return 301 https://$server_name$request_uri;
}

server {
    listen 443 ssl http2;
    server_name vault.nasir.id;

    ssl_certificate /etc/letsencrypt/live/vault.nasir.id/fullchain.pem;
    ssl_certificate_key /etc/letsencrypt/live/vault.nasir.id/privkey.pem;

    # SSL Configuration
    ssl_protocols TLSv1.2 TLSv1.3;
    ssl_ciphers ECDHE-RSA-AES256-GCM-SHA512:DHE-RSA-AES256-GCM-SHA512:ECDHE-RSA-AES256-GCM-SHA384:DHE-RSA-AES256-GCM-SHA384;
    ssl_prefer_server_ciphers off;
    ssl_session_cache shared:SSL:10m;
    ssl_session_timeout 10m;

    # Security headers
    add_header Strict-Transport-Security "max-age=31536000; includeSubDomains" always;
    add_header X-Frame-Options DENY;
    add_header X-Content-Type-Options nosniff;
    add_header X-XSS-Protection "1; mode=block";

    location / {
        proxy_pass http://127.0.0.1:8200;
        proxy_set_header Host $host;
        proxy_set_header X-Real-IP $remote_addr;
        proxy_set_header X-Forwarded-For $proxy_add_x_forwarded_for;
        proxy_set_header X-Forwarded-Proto $scheme;
        proxy_set_header X-Forwarded-Port $server_port;

        # WebSocket support for UI
        proxy_http_version 1.1;
        proxy_set_header Upgrade $http_upgrade;
        proxy_set_header Connection "upgrade";

        # Timeouts
        proxy_connect_timeout 60s;
        proxy_send_timeout 60s;
        proxy_read_timeout 60s;
    }
}
After configuring Nginx:
sudo ln -s /etc/nginx/sites-available/vault.nasir.id /etc/nginx/sites-enabled/
sudo nginx -t
sudo systemctl reload nginx
Initializing and Unsealing Vault
With Vault running and accessible via HTTPS, the final step was initialization:
export VAULT_ADDR="https://vault.nasir.id"
vault operator init
This command generates the master keys and root token. Please keep this information in safe place. In a real production environment, you’d use auto-unsealing with cloud KMS, but for learning purposes, manual unsealing works perfectly:
vault operator unseal <key1>
vault operator unseal <key2>
vault operator unseal <key3>
Finally, authenticate with the root token:
vault auth <root_token>At this point, I had a fully functional, SSL-secured Vault instance ready for experimentation and real-world testing.
Practical Example: Securing MySQL Database Credentials
Now comes the exciting part—putting Vault to work in a real scenario. One of the most common use cases I encountered during the migration project was securely managing database credentials. Let me walk you through a practical example of storing MySQL connection details in Vault and retrieving them for seamless database access.
Storing MySQL Credentials in Vault
First, I enabled the Key-Value secrets engine (if not already enabled) and stored our MySQL database credentials:
# Enable KV secrets engine at path 'secret' (usually enabled by default)
vault secrets enable -path=kv kv-v2
# Store MySQL credentials as key-value pairs
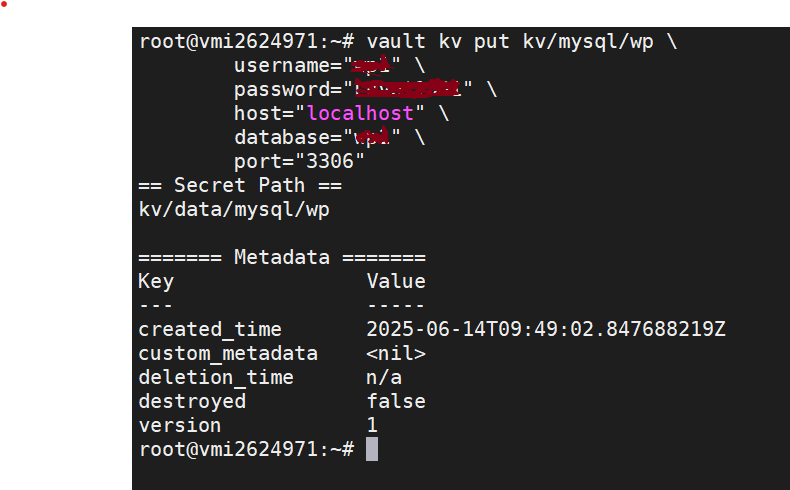
vault kv put kv/mysql/wp \
username="<your_username>" \
password="<your_password" \
host="<your_db_hostname" \
database="<your_db_name" \
port="<your_db_port"Once you succeed, you will see this message
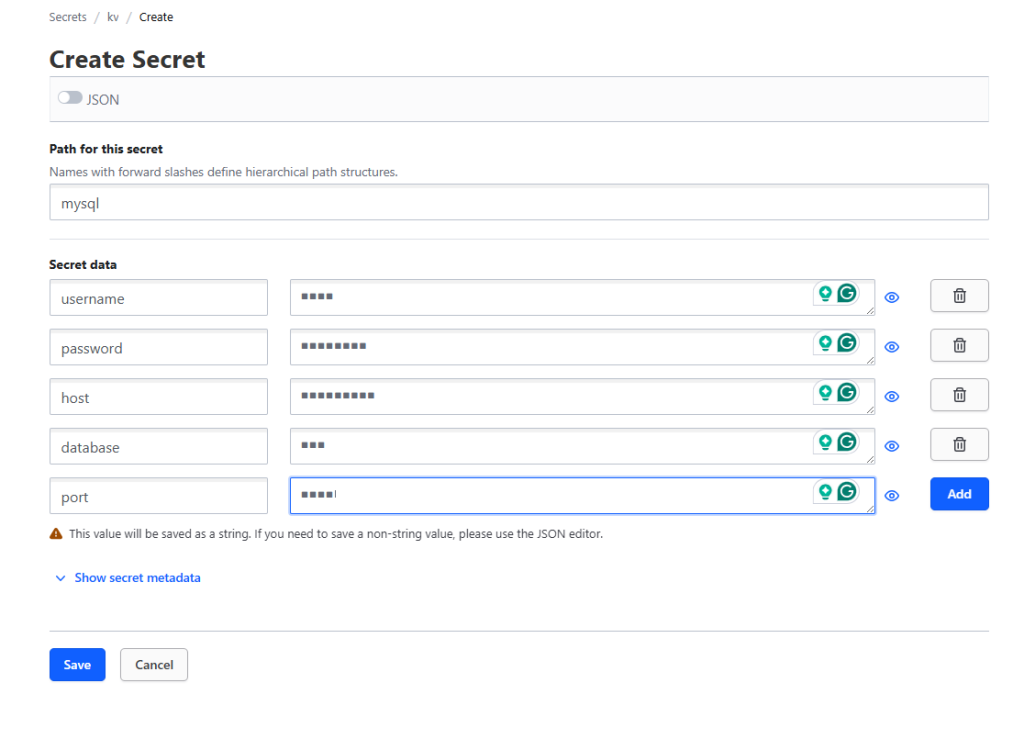
You also can do this via UI. Enable new engine, choose KV and Create secret

You see that complete API path would be v1/kv/data/mysql/wp. But actually you need to call kv/mysql/wp
Retrieving Credentials for Database Connection
Now, here’s where Vault truly shines in automation scenarios. Instead of hardcoding credentials or storing them in environment files, I can retrieve them dynamically:
# Set Vault address and authenticate (if not already done)
export VAULT_ADDR="https://vault.nasir.id"
export VAULT_TOKEN="your-vault-token"
# Retrieve individual values
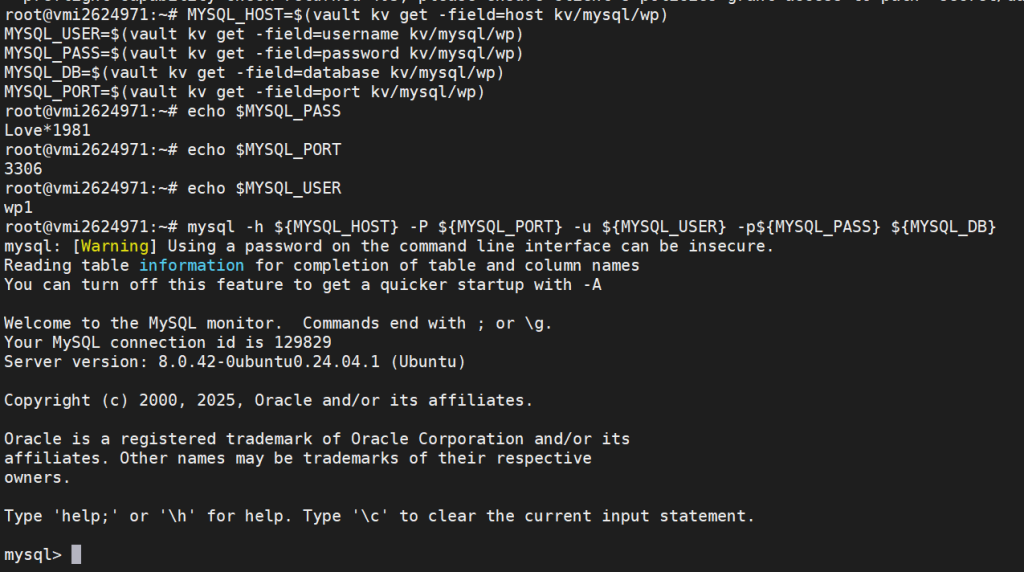
MYSQL_HOST=$(vault kv get -field=host kv/mysql/wp)
MYSQL_USER=$(vault kv get -field=username kv/mysql/wp)
MYSQL_PASS=$(vault kv get -field=password kv/mysql/wp)
MYSQL_DB=$(vault kv get -field=database kv/mysql/wp)
MYSQL_PORT=$(vault kv get -field=port kv/mysql/wp)
# Connect to MySQL using retrieved credentials
mysql -h ${MYSQL_HOST} -P ${MYSQL_PORT} -u ${MYSQL_USER} -p${MYSQL_PASS} ${MYSQL_DB}If you configure properly you can login to MySQL
Creating a Reusable Script
To make this more practical for daily use, I created a simple bash script that handles the credential retrieval and connection:
#!/bin/bash
# mysql-connect.sh - Connect to MySQL using Vault credentials

# Check if Vault is accessible
if ! vault status &> /dev/null; then
    echo "Error: Cannot connect to Vault. Please check your VAULT_ADDR and authentication."
    exit 1
fi

# Retrieve credentials from Vault
echo "Retrieving MySQL credentials from Vault..."
MYSQL_CREDS=$(vault kv get -format=json kv/mysql/wp)

if [ $? -ne 0 ]; then
    echo "Error: Failed to retrieve credentials from Vault"
    exit 1
fi

# Parse JSON response to extract individual fields
MYSQL_HOST=$(echo $MYSQL_CREDS | jq -r '.data.data.host')
MYSQL_USER=$(echo $MYSQL_CREDS | jq -r '.data.data.username')
MYSQL_PASS=$(echo $MYSQL_CREDS | jq -r '.data.data.password')
MYSQL_DB=$(echo $MYSQL_CREDS | jq -r '.data.data.database')
MYSQL_PORT=$(echo $MYSQL_CREDS | jq -r '.data.data.port')

# Validate that we got all required fields
if [[ "$MYSQL_HOST" == "null" || "$MYSQL_USER" == "null" || "$MYSQL_PASS" == "null" ]]; then
    echo "Error: Missing required credentials in Vault"
    exit 1
fi

echo "Connecting to MySQL database: $MYSQL_DB on $MYSQL_HOST:$MYSQL_PORT"
echo "User: $MYSQL_USER"
echo ""

# Connect to MySQL
mysql -h ${MYSQL_HOST} -P ${MYSQL_PORT} -u ${MYSQL_USER} -p${MYSQL_PASS} ${MYSQL_DB}
Advanced: One-liner for Quick Connections
For quick access, you can create a one-liner that retrieves credentials and connects in a single command:
# One-liner to connect to MySQL via Vault
mysql $(vault kv get -format=json secret/database/mysql | jq -r '"--host=" + .data.data.host + " --port=" + .data.data.port + " --user=" + .data.data.username + " --password=" + .data.data.password + " " + .data.data.database')
This example show how to handle database access. Instead of developers having hardcoded credentials in their scripts or .env files scattered across different environments, everything was centralized in Vault. The benefits became immediately apparent:
- Credential Rotation: When we needed to rotate the MySQL password, we updated it once in Vault, and all applications automatically used the new credentials
- Audit Trail: Every credential access was logged, giving us visibility into who accessed what and when
- Environment Consistency: The same script worked across development, staging, and production environments, with different Vault paths for each environment’s credentials
- Security: No more credentials in version control or configuration files
Conclusion
My journey from HashiCorp Vault certification to hands-on implementation during the startup migration project has been eye-opening. Setting up Vault on Ubuntu 24.04 with proper SSL configuration and implementing real-world scenarios like MySQL credential management transformed my theoretical knowledge into practical expertise. The difference between passing an exam and actually deploying, configuring, and troubleshooting Vault in production is substantial—but bridging that gap through hands-on experience has made me significantly more confident and capable when working with secrets management infrastructure. For anyone holding a Vault certification but lacking practical experience, I highly recommend setting up your own instance and experimenting with real use cases; the investment in hands-on learning will pay dividends in your professional development.
You can see installation script : https://github.com/nasir19noor/nasir.id/blob/main/packages/vault.sh
Also published in medium : https://nasir19noor.medium.com/from-paper-to-practice-my-real-world-hashicorp-vault-learning-journey-2b1d35be7dc5